-
Notifications
You must be signed in to change notification settings - Fork 10
The Integration of Modules and Resources into #ASKtraining
This module serves as a comprehensive guide for users navigating the integration of modules and resources within the #ASKtraining platform. It entails the operation of a GitHub repository and its associated dataset. Through detailed, step-by-step instructions, users are seamlessly guided through the process of incorporating content into the platform, ensuring a smooth integration experience."
This unit guides you through working with the GitHub repository.
A repository can be compared to a folder where files and additional subfolders are stored. A repository can have specific a name (like a folder). Additionally descriptions can be added. A repository can be public or private and only accessible to certain people. You decide who can see your content.
The big difference to a simple folder (local or online) is that a repository remembers every change (what was done and by whom). In addition, the differences between the various work statuses can be seen quite clearly.
Forking a repository is creating new copy of an existing repository. Forking allows you to freely edit a repository without affecting the original copy of the repository. Most commonly, forks are used to either propose changes to someone else’s project or to use someone else’s project as a starting point for your own idea.
- Navigate to the ASKnetCommunity Training repository
- Click on
Fork

- In case you are a memeber in different organizations choose an
Owner(if you have a personal account only, ignore this step) - Click on
Create fork
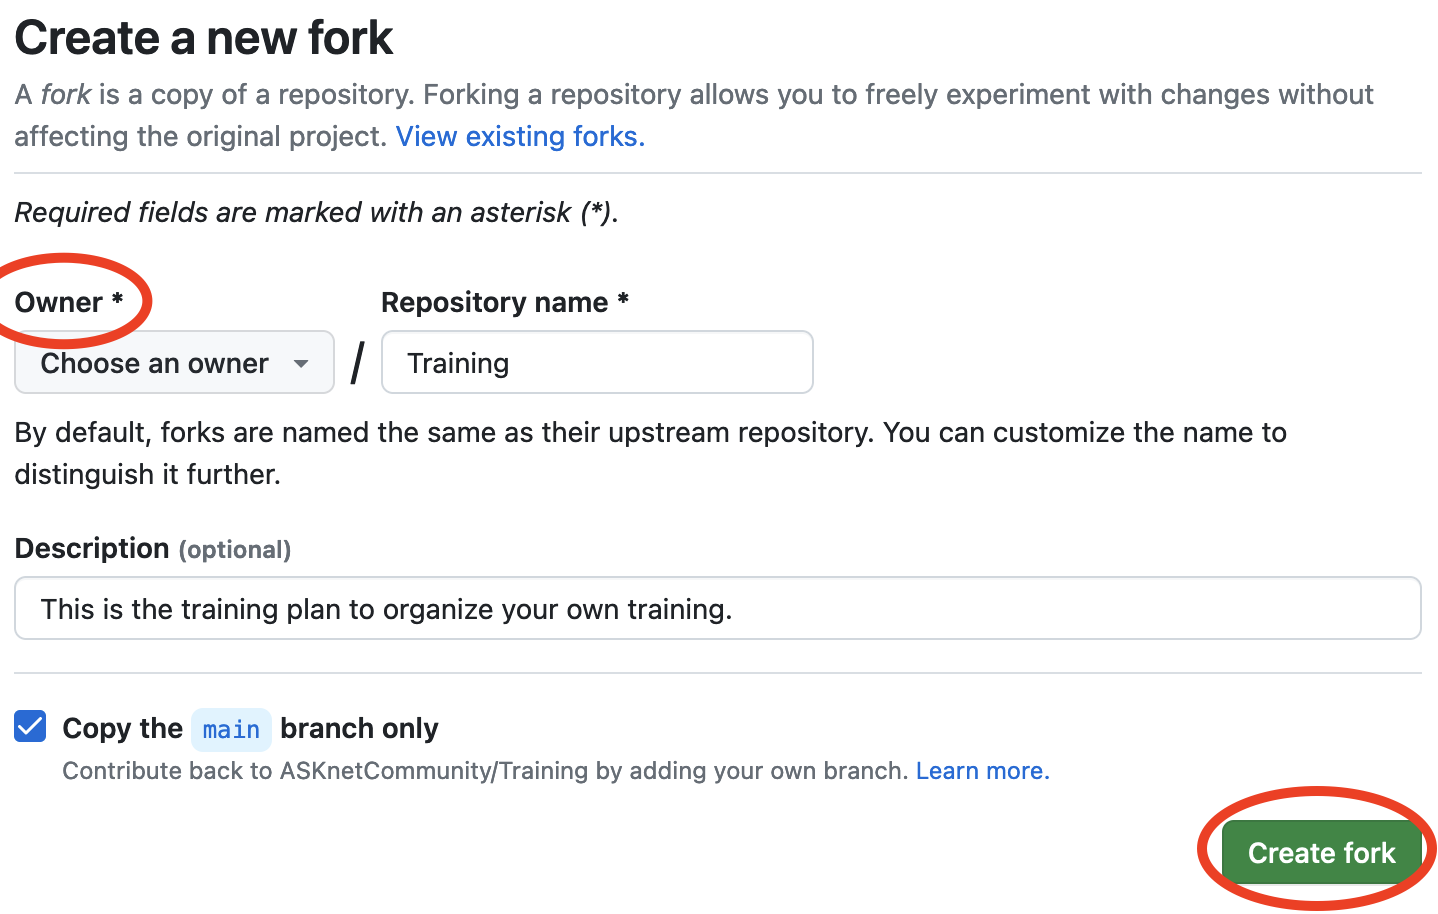
- You will be automaticly redirected to your fork (copy) of the repository in your personal space
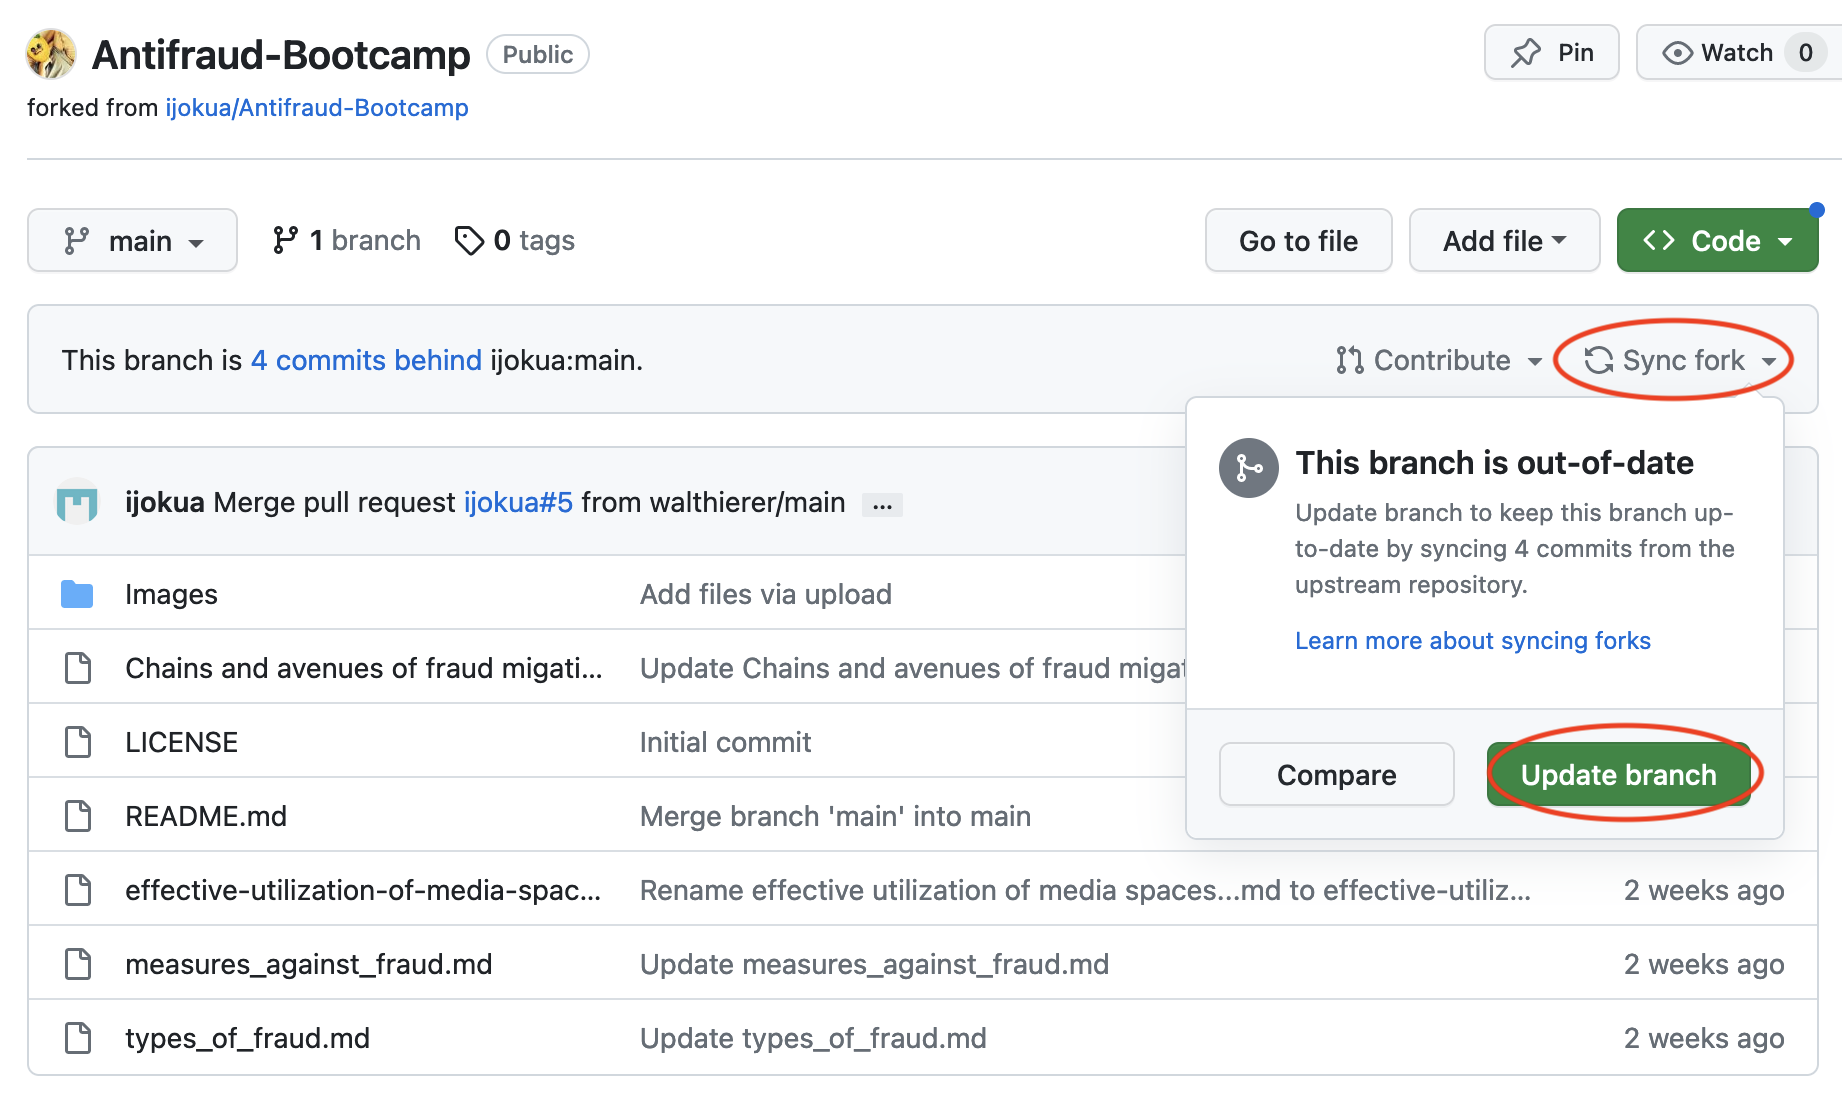
Note: Before you begin working within your forked repository, ensure that your personal branch is up to date to prevent conflicts.
- Click on the
Sync forkdropdown. - If your branch is out-of-date, click the green
Update branchbutton.
Explore the concept of Modules and Resources in this section, understanding what they entail and how to create them for #ASKtraining.
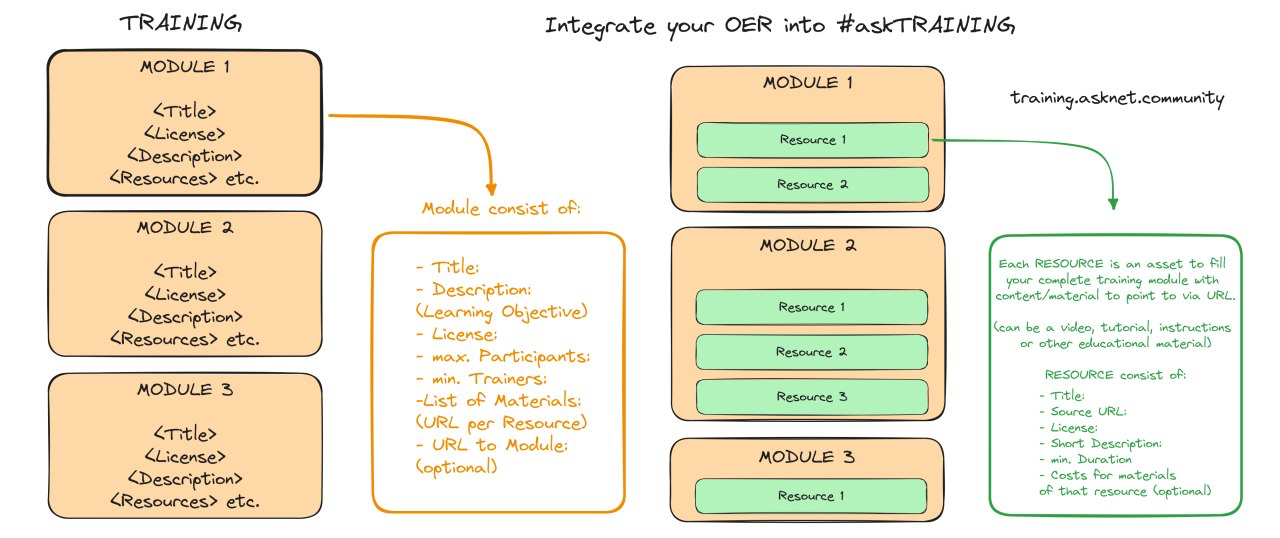
A training program comprises three hierarchical levels. The initial level focuses on the overall training concept. Within this framework, we have modules at the second level, each of which contains a collection of resources at the third level. Both modules and resources can be either newly created or existing resources can be incorporated into a module.
A module represents a self-contained teaching unit centered around a specific topic and typically includes a variety of resources (e. g. educational resources, tools, etc.). The creation and management of these modules and resources are facilitated through GitHub and integrated on the #ASKtraining platform.
In the forked repository of the ASKtraining repository are templates for creating Modules and Resources.
-
Path for the template for Modules:
Training/_modules/.template/template.md
-
Path for the template for Resources:
Training/_resources/.template/template.md
The code for these templates is also provided at the end of this document.
- Go to the template in your forked repository (path provided above)
- Click on the
Code-Button located in the grey upper row (betweenPreviewandBlame) - Copy the content
- (Or copy the code provided at the end of this document)
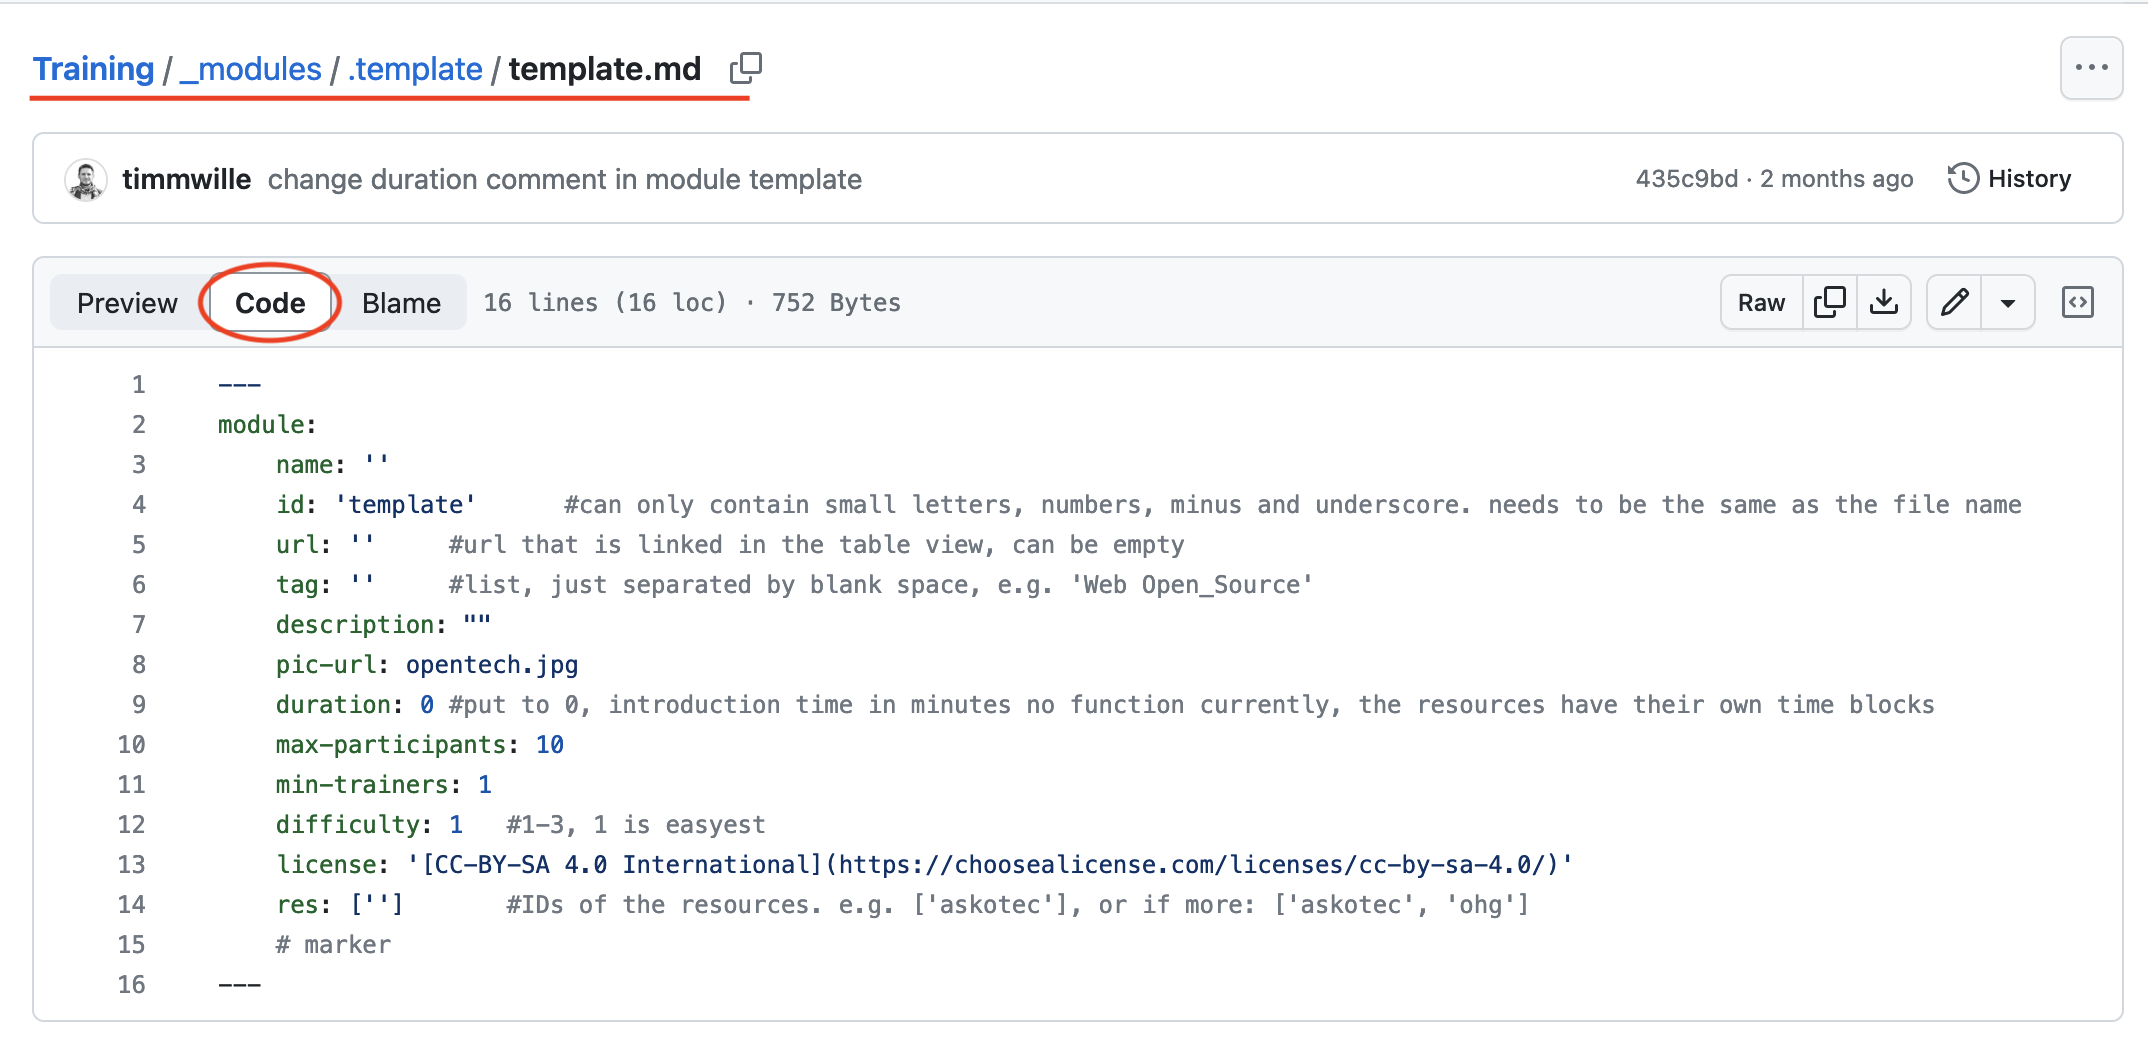
- Return to the modules folder (if you are creating a new module)
- Click on
Add file, then select+ Create new file

- Paste the copied content from the template file into the text area
- Select a descriptive and self-explanatory name for your module
-
Don't forget to use the correct file extension / file format! In this case it should be
.md(for Markdown). - Never include spaces in your file name.
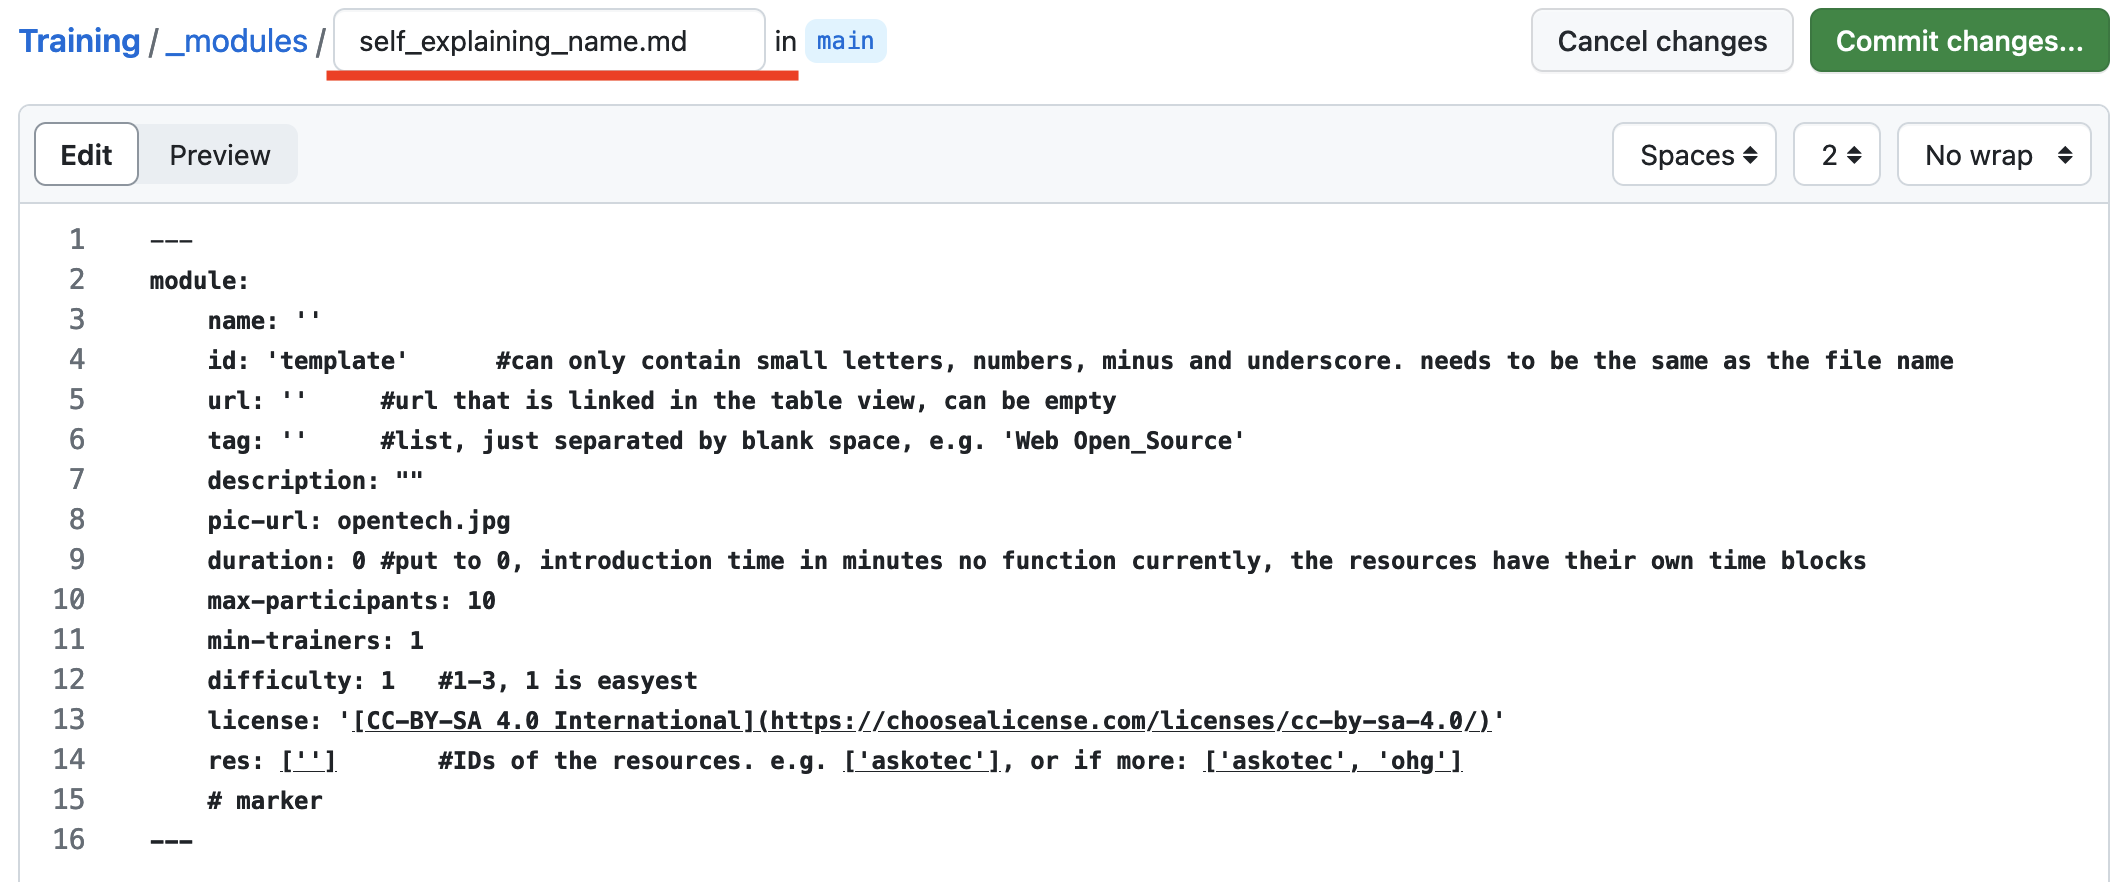
The template file contains various tags, such as name, id, url, tag, description, etc., and includes explanations for nearly all of these tags. Explanations are introduced with a #. The hashtag is utilized for comments. Comments do not impact the code and are not visible when displayed. They serve to clarify the required syntax and provide hints regarding the content. Feel free to remove the explanations.
As for the module file, the res tag holds significant importance; 'res' stands for resource. Following this tag, all integrated resources of the module are listed within single quotes, separated by commas, identified by their ID. The following image provides an example of the resources used for a DIY Water Filter module.

Each module also includes a descriptive image, which is specified using the pic-url tag. To include the image, you only need to provide the image file name with the pic-url tag like this: pic-url: image_name.jpg
The image itself should be uploaded to the folder provided for this purpose, located at the following path:
Training/assets/img/modules
According to the resource file, the url tag holds the utmost importance. It establishes the link between the #ASKtraining platform and the Open Educational Resource. Simply copy the OER's link and paste it after this tag.
In case the OER is a text document hosted on GitHub, use the link provided under the respective headings. Please note that a single document can be used for multiple resources!
Following image shows the link symbole provided by a heading.

- Click on the link icon
- Copy the URL in the browser
- Paste into your resource file
A resource can encompass various forms, such as a text document, a video, a poster, graphics, or even a tool that is required to complete the tasks within a training.
Enhance your understanding of essential GitHub functions and learn how to seamlessly integrate Modules and Resources on #ASKtraining.
Branches are used to work on distinct features independently, ensuring that the master branch remains unaffected by any changes. When you create a repository, the master branch serves as the default. Use other branches for development purposes, and merge their changes into the master branch once they are completed. When you fork a repository, you're essentially creating your personal branch of the master branch.

A Pull Request notifies the owner of the original repository about modifications made within the personal forked repository - your branch of the master repository. These modifications are referred to as Commits. The pull request is mandatory to incorporate the updates into the main branch, which serves as the public presentation of the #ASKtraining platform.
Once a pull request is initiated, it enables the owner of the master branch to engage in discussions and review the proposed changes with all collaborators.
After commiting (safing) your modifications the overview of your forked repository indicates these changes.

- Click on
.. commit ahead - You will be directed to the
Comparing changespage, which highlights the modifications made. - In the "base branch" dropdown menu, choose the branch from the upstream repository into which you'd like to merge the changes.. In this case use
development. - Click on the green
Create pull requestbutton.
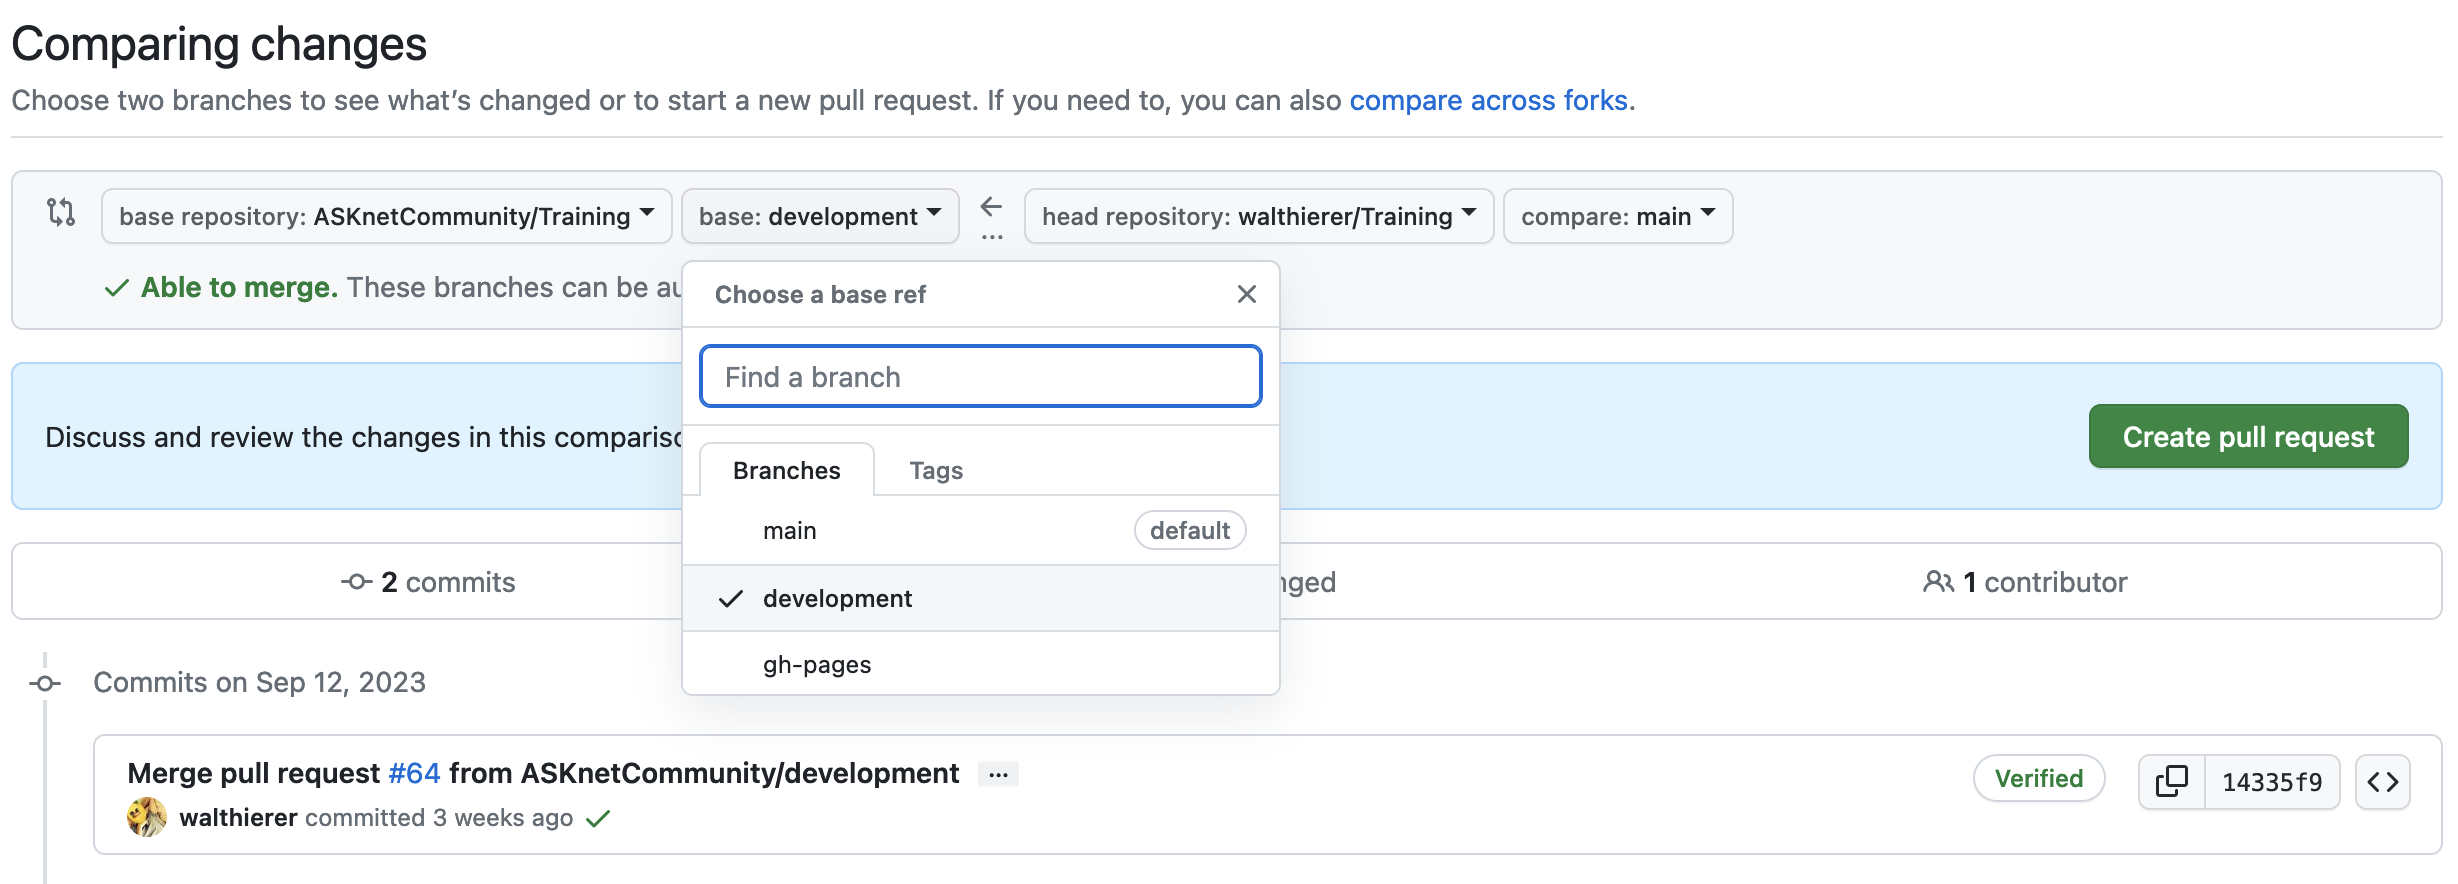
- You will be directed to the
Open a pull requestpage, which allows you to title and describe your pull request. Give at least a descriptive and self-explanatory title! - Click on the green
Create pull requestbutton.
After you've opened your personal pull request, your modifications will undergo a review by members of the #ASKnet team. Once the changes are approved, they will be merged into the master branch.
In this section you can find the code templates for creating Modules and Resources for #ASKtraining. Get the original Template code for Modules and Resources with the links.
---
layout: module
module:
    name: ''
    id: 'template'      #can only contain small letters, numbers, minus and underscore. needs to be the same as the file name
    url: ''     #url that is linked in the overview of a module (manual, educational instructions for the overall module etc.), can be empty
    tag: ''     #comma-separated list, e.g. 'Web' or if more than 1: 'Open Source & Knowledge, Hardware & Repair, Sustainability & Environment, Media & Art, Community & Moderation, Data_Security & Research'
    description: ""
    pic-url: opentech.jpg
    duration: 15 #module introduction time (NOT module duration) in minutes, the resources have their own time blocks to build up the module time!
    max-participants: 10
    min-trainers: 1
    difficulty: 1   #1-3, 1 is easyest
    license: '[CC-BY-SA 4.0](https://choosealicense.com/licenses/cc-by-sa-4.0/)'
    res: ''       #comma-separated list e.g. 'askotec', or if more than 1: 'askotec, ohg'
---
---
resource:
    name: ''
    id: 'template'      #can only contain small letters, numbers, minus and underscore. needs to be the same as the file name
    description: ""
    url: ''
    duration: 0     #in minutes, 0 min for "tool-kits" with no educational timeframe
    difficulty:     #1-3, 1 is easyest
    cost: 5      #in $ (dont leave empty, but type 0 instead)
    license: '[CC-BY-SA 4.0](https://choosealicense.com/licenses/cc-by-sa-4.0/)' #e.g. CC BY-SA 4.0, can have [link](URL)
    author: '' #add the author/organisation name in here, use [markdown](URL) formatting to link to website/reference. You can add also multiple authors via '[author 1](link1), [author 2](link2), author 3'
---