-
Notifications
You must be signed in to change notification settings - Fork 63
Getting Started with embARC Using GNU on Windows
- Downloading and Installing the embARC Software
- Downloading and Installing the Eclipse IDE with GNU Toolchain for ARC
- Building and Running Your First Example
- embARC 2017.12 (or higher) and ARC GNU 2017.09 (or higher) are required.
- Go to emARC OSP Documentation for more details.
This section tells you how to download and install the embARC Open Software Platform.
-
To download the embARC Software, visit embARC OSP release page.
-
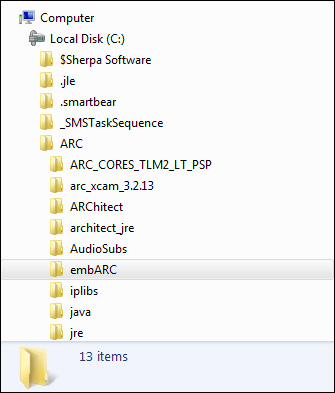
Unzip the software to your preferred location, such as
C:\ARC. This step creates a subfolder calledembARC.

There should be no whitespace in the path to the embARC location. Whitespace causes problems when you build the examples using the provided makefiles.
Prebuilt versions of the ARC GNU tools are available from the Github website.
-
Download the latest release installer from ARC GNU tools release page.
-
Run the installer to install the IDE in default location:
C:\arc_gnu. -
Use Zadig to replace FTDI driver with WinUSB driver. Go to How to Use OpenOCD on Windows for more information.
- This location is required for the example scripts to run properly.
- Zadig is required to use OpenOCD on Windows.
The blinky example is used here in exmaple/baremetal/blinky. The same build and run steps are useful for other examples on different ARC-based boards. For additional documentation, see doc/embARC_Document.html in the source code archive.
This demo uses the following:
- Baremetal exmaple running on EMSK
- GPIO drivers on EMSK
This example assumes that you have set up the EMSK hardware and installed PuTTY or equivalent, as described in Setting up the EM Starter Kit.
-
Open the ARC GNU IDE and set the workspace location to
ide_projects/<board_name>_<board_version>/<toolchain>, for exampleide_project/emsk_11/gnuin the embARC source root. -
Click File->New->Makefile Project with Existing Code to open the New Project wizard.
-
In the Import Existing Code step, Set
blinkyin the Project Name and<embARC_root>/exmaple/baremetal/blinkyin the Existing Code Location. CheckCandC++in the Languages. Set proper toolchain in the Toolchain for Indexer Settings, for example,GNU Toolchain for ARC EMfor EMSK. -
Open the
makefileinexmaple/baremetal/blinky. Add the following code in it, whereBOARDis board name supported in embARC, BD_VER is board version, and CUR_CORE is core name.
TOOLCHAIN=gnu
BOARD=emsk
BD_VER=11
CUR_CORE=arcem6-
Bulid the project in the ARC GNU IDE. When the build process is finished, open Debug Configurations.
- Click Run->Debug Configurations.... Create a new debug configuration for this project.
- In the label Main, choose
blinkyin correct elf file in the C/C++ Application, for exampleobj_emsk_11/gnu_arcem6/blinky_gnu_arcem6.elf. - In the label Debugger, go to Debugger Options->Gdbserver Settings. Choose
JTAG via OpenOCDin ARC GDB Server. In the JTAG via OpenOCD setting, chooseEM Start Kit v2.2for EMSK 2.3 andEM Start Kit v1.Xfor EMSK 1.1 in Development system. - Click
Debugto begin the debug process.
-
Click the red Terminate button on the toolbar and return to the C/C++ perspective.
- Change to
<embARC_root>/exmaple/baremetal/blinkyand type the following commands in the command line.
make TOOLCHAIN=gnu BOARD=emsk BD_VER=11 CUR_CORE=arcem6 clean
make TOOLCHAIN=gnu BOARD=emsk BD_VER=11 CUR_CORE=arcem6- Type the following command to invoke GDB to debug the project.
make TOOLCHAIN=gnu BOARD=emsk BD_VER=11 CUR_CORE=arcem6 guiembARC - Accelerate software development of embedded systems based on DesignWare ARC processors