Sampleman is a simple browser based tool designed for the experimental sciences to manage labbooks, images and measurement data of your fabricated samples. Sampleman maintains these in a database that is entirely based on folder structure and ascii files.
What is a sample? A sample can be anything that is being machined or processed by you and where a precise record of recipe details and observations during the process are of interest. Sampleman creates a sample ID for every sample, which is a combination of a fixed prefix and a number, XYZ123 for example. The prefix XYZ identifies the owner of the sample and the number 123 is the sample number. Sampleman further creates a folder named after this sample ID and stores all applied steps in the plain-text markdown file labbook.md within this folder.
What is a step? A step is anything that you do to your samples that is worth a labbook entry. Sampleman creates labbook entries with time, date and a unique step ID for every step that you enter. You can store text templates of step descriptions for steps you perform on a regular basis. Files can be attached to steps and are stored in sub-folders of the sample folder. These sub-folder's names are created from the step ID and step name for easy recognition by both man and machine.
If, for example, a sample exists with the sample ID XYZ132, and a cleaning step with the step ID 45 has an attached file "microsocopy.jpg", the folder structure of the database would look like this:
samples
  \ XYZ132
      | labbook.md
      \ 45-cleaning
          \ microscopy.jpg
Manually editing any of the files in the database is of course possible and the sampleman front-end will display the changes immediately. Just make sure you do not change sample and step IDs, because sampleman needs these to parse the database.
In case you have any questions/remarks/wishes, feel free to contact me or open an issue.
Download the binaries of the latest release for your platform. Unpack the archive if needed and place the executable in a path that seems reasonable to you. This path should be writable for your user account, because the configuration file will be created there. Run the executable. A browser window should open, showing the sampleman front-end.
Having trouble executing? On a linux machine, make sure the downloaded file has the "execute" permission flag set (usually found in "right-click menu" -> "properties"). On newer MacOs machines it may be very tricky to run the executable, because of the strict code-signing requirements. Maybe it is worth trying to run from source.
The executable for your platform is missing? Then see how to run sampleman from source at the bottom of this readme, or contact me to have your platform to the list.
Upon starting the file sampleman.config.txt is created in the location you placed the executable. To customize your configuration, close sampleman in the browser and open the sampleman.config.txt with a text editor of your choice.
Then adjust these three settings in database section of the config file according to your needs:
database:
  baseDir: ~/Documents/samples
  samplePrefix: XYZ
  ...
The baseDir specifies the path, where sampleman will create your sample database. The symbol ~ can be used as shortcut for your user account's home folder, which is usually where Documents, Downloads, Desktop and similar folders are located. Relative paths are interpreted relative to the folder of the sampleman executable.
The samplePrefix specifies the prefix that all your sample IDs will get. If it is ABC, the sample folders will be named ABC001, ABC002, etc.
Save your changes to sampleman.config.txt and launch sampleman again. Your configuration should now be in effect. For a full description of all configuration keys, see the advanced configuration section.
If you followed the installation instructions you should now see the following on the right in your browser window:

Instead of XYZ this should show your configured prefix. In the sample aim field you can enter a title for your sample, ideally describing why you plan to prepare this sample. In this example I chose "learning about stuff" as the sample aim. Then hit the "New sample: ..." button to create your first sample entry. Next you should see the following:

The left coloumn shows the overview of all your created samples, which is only one sample so far. The sample names are clickable to open the samples labbook. The central column shows the current sample's labbook, which lists all steps done in chronological order, with the oldest step on the bottom. The labbook should currently be empty. The right column allows to add entries to the labbook.
Enter an "step title" and "step description" and hit "add step". Every line in the "step description" field results in a bullet point in the labbook. If you indent lines in the "step description" field with spaces, you can create different levels in the bullet point list.
In this example, I created the following first step:

As you can see, the date, time and an step ID (001 here) are automatically added.
Entering title and description manually every time you add a step is cumbersome. Because you usually do the same or similar step with many samples, templates with placeholders are very helpful to speed things up. For this, create a plain-text file in the templates folder within your dbDir folder.
In the first line of the file, write the desired step title. In the following lines, write the desired step description. You can use underscores as placeholders, for text that should be filled in individually for every sample. For example:
Standard cleaning

Immerse sample in solvent ___ for __mins
Let sample dry for ___mins
Inspect sample surface: __________
The filename should end with .txt, and it is recommended not to use spaces. The templates are listed in alphabetical order of their filenames, a leading number can thus be used to achieve a custom sorting. In this example, the filename 01-cleaning.txt is chosen. After creating the file, reload the sampleman front-end in the browser. A new button should appear in the "Load Template" section:

Click it to fill in the "step title" and "step description" fields with the template content. Use the "tab" key to select the placeholders in the step description and enter the desired values. After tabbing through and replacing all placeholders, either press the "add step" button or use "ctrl+enter" to save the step.
Next, we want to add some additional files to this step entry. In practice this could be microscopy images or measurement results for example. To add any file, we need the "attach files" section in the bottom right:

There are two possible sources to upload a file from: Directly selecting files via the "choose files" button, or from the local upload folder, which is the directory specified as updloadDir in config.json. Checking the "Use local upload folder instead of direct file upload"-checkbox selects the second option, leaving it unchecked uses files selected with the "choose files" dialog.
In the "Identify with step ID"-input, you can optionally enter a step ID to identify the selected files with. If this input remains empty, the files are identified with the latest step.
In the "Upload file count"-input, you can enter a number to limit the amount of files selected from the local upload folder. If left free, all files contained in the local upload folder are used. This setting is ignored if the "choose files" dialog is used as a source for files.
The uploaded files are added to a folder corresponding to the step. The folder is automatically created if it does not exist. The folder name must begin with the step ID, the rest of the name can be changed at will. By default, the folder name is created from the longest word in the step title.
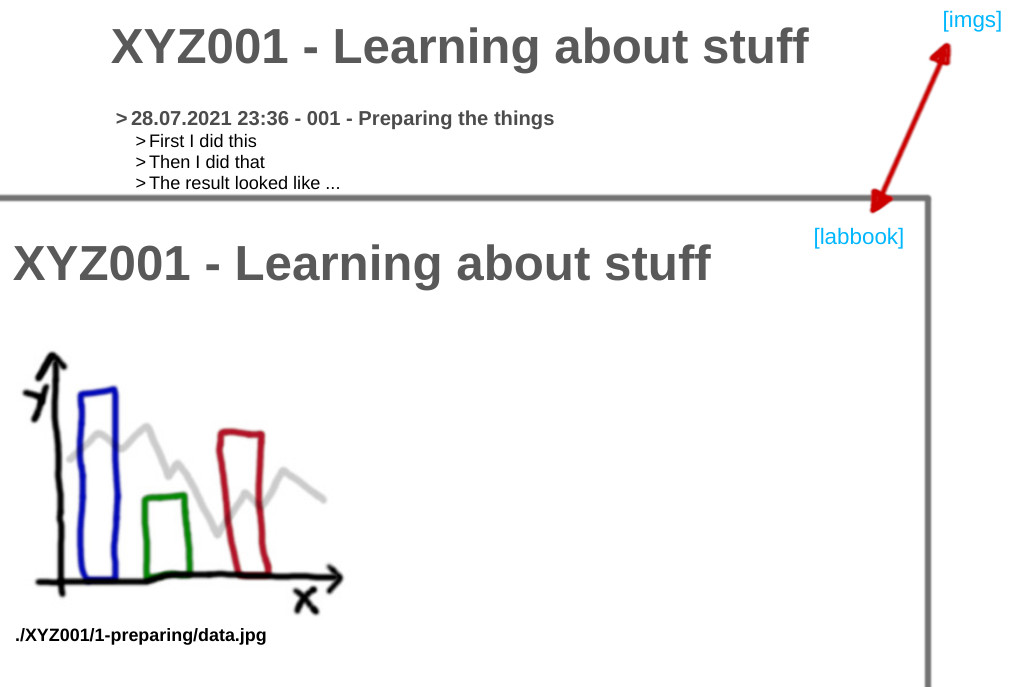
Attached image files in the jpg or png formats are displayed in the sample gallery in chronological order. The labbook/gallery view can be toggled with the [imgs]/[labbook] links that appear if there are images attached to a sample:
The config file is stored in YAML syntax. Sections are grouped by indentation, and key-value pairs are separated by colons:
...
section:
  key: value
  ...
If you delete or rename the config file, sampleman creates a new config file with the default values. If sampleman fails to parse the config file, the config file is renamed and a new config file with the default settings is created.
All available configuration sections and keys, as well as their default values and descriptions are listed in the following table:
| config section | config key | default value | description |
|---|---|---|---|
database |
baseDir |
~/Documents/samples |
Base path of the sample database. The ~ symbol is replaced with the current user's home directory. Relative paths are interpreted relative to the executable's path. |
uploadDir |
"" |
Directory from which files are grabbed, if attaching files with the "use local upload folder"-option. The ~ symbol is replaced with the current user's home directory. Relative paths are interpreted relative to the executable's path. |
|
samplePrefix |
XYZ |
Prefix for sample IDs. With the prefix XYZ the sample folders will be called XYZ001, XYZ002, XYZ003, etc. |
|
stepIdLen |
3 | Length of the step ID. With the default step ID length 3, the attachments folder for step number 7 will be be called 007-stepname/. This ensures equivalence of alphabetical and numerical order for up to 999 steps. |
|
app |
autoQuit |
true |
If true, quit sampleman if all browser tabs are closed. If false, keep the sampleman process running forever. The latter is useful if you enable sampleman to auto start on boot, which allows you to open sampleman at any time by visiting the sampleman URL, e.g. localhost:3000, in your browser. " |
http |
accessToken |
"" |
If set to a nonempty value, sampleman will require you to enter this token before granting write access to your database through the browser. Caution: this token is not a password, it is stored as clear text and can be easily stolen with a little criminal energy. Only use to prevent accidental database modifications. |
public |
false |
If false, sampleman is only available on the machine that runs it. If true, sampleman is available on all machines that can reach your machine through the network, which is typically your home or company network. The URL shown in the browser can thus be entered on any machine in the network in this case. In case you have problems finding sampleman from other machines, make sure that you use URLs that start with http://... and not https://... and that your router or company firewall allows communication between network members. |
|
port |
3000 |
HTTP port to listen on. |
To run sampleman from the source code, make sure that node and npm are installed on your system. Open up a shell and run node --version and npm --version, both should run without an error. Then, clone this repository and run sampleman.sh to start sampleman from source.
Any changes in the views/ and public/ folders are effective after a refresh in the browser, changes in bin/ and scripts/ require stopping and restarting sampleman.sh. Standalone executables for common platforms can be built with the build-releases.sh script.