![]()
Welcome to the Amiga 500 Keyboard interfacing project! This guide will help you connect and map the iconic Amiga 500 keyboard to an Arduino Leonardo, allowing you to bring new life to this classic piece of hardware. By following the instructions provided, you can retrofit the Amiga 500 keyboard for modern applications while preserving its unique layout and feel.
For a demonstration of the original Amiga 500 keyboard in action, visit the Amiga Undead GitHub repository.
This section describes the wiring for connecting the Amiga 500 keyboard to an Arduino Leonardo.
To connect the Amiga 500 keyboard to the Arduino Leonardo, refer to the following table:
| Connector Pin | Function | Wire Color | Arduino Leonardo IO Pin |
|---|---|---|---|
| 1 | KBDATA | Black | 8 |
| 2 | KBCLK | Brown | 9 |
| 3 | KBRST | Red | 10 |
| 4 | 5V | Orange | 5V |
| 5 | NC | - | - |
| 6 | GND | Green | GND |
| 7 | LED1 | Blue | 5V |
| 8 | LED2 | Purple | - |
- KBDATA (Black, Pin 1): Connects to Arduino Leonardo digital pin 8. This line transmits data from the keyboard to the Arduino.
- KBCLK (Brown, Pin 2): Connects to Arduino Leonardo digital pin 9. This line provides the clock signal for synchronization.
- KBRST (Red, Pin 3): Connects to Arduino Leonardo digital pin 10. This line allows the Arduino to send a reset signal to the keyboard.
- 5V (Orange, Pin 4): Connects to the 5V power supply on the Arduino.
- NC (Pin 5): Not connected.
- GND (Green, Pin 6): Connects to the GND pin on the Arduino.
- LED1 (Blue, Pin 7): Connects to 5V for indicating power.
- LED2 (Purple, Pin 8): Not connected.
Credit: AmigaOS Wiki
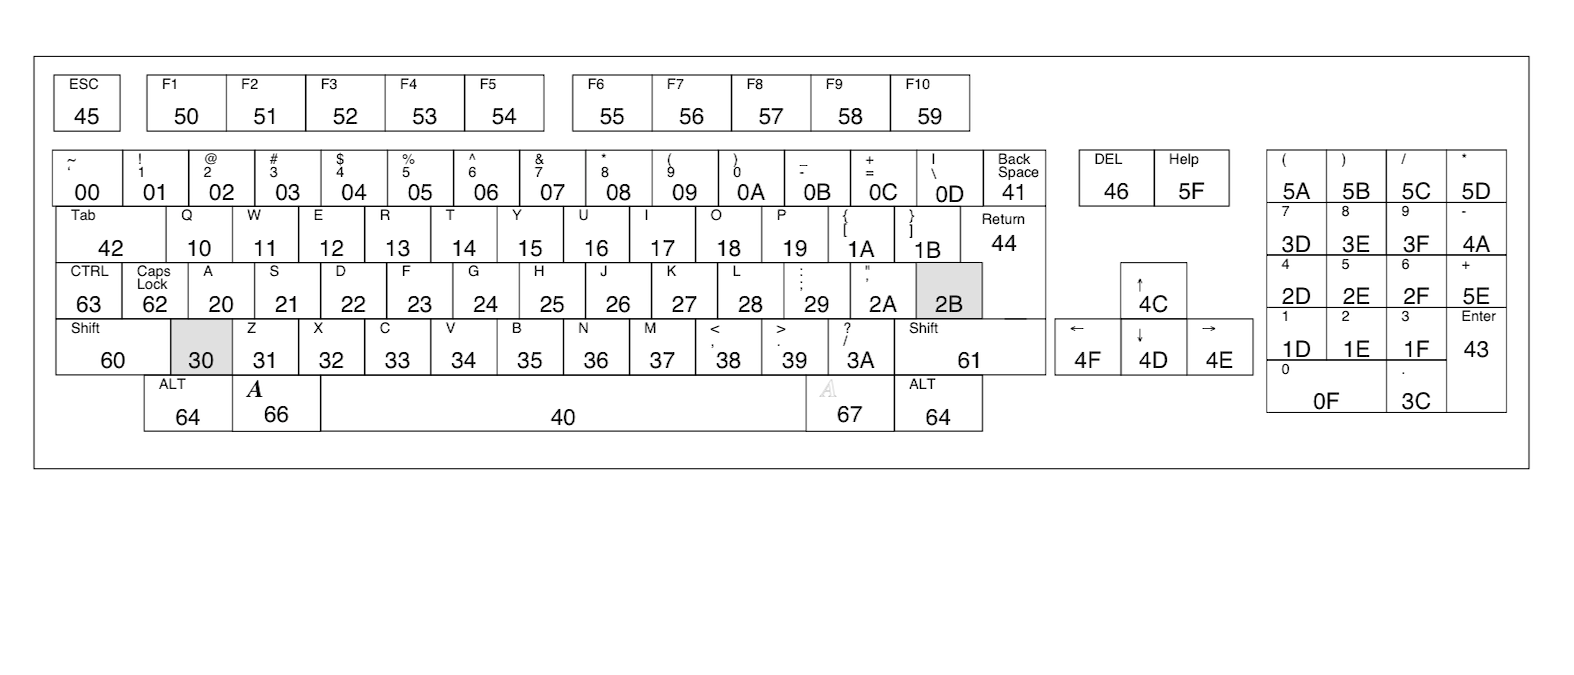
The Help key on the Amiga 500 keyboard is used as a modifier in this implementation, enabling additional functions when combined with other keys. Below are the available combinations and their corresponding functions.
| Key Combination | Function |
|---|---|
| Help + F1 | F11 |
| Help + F2 | F12 |
| Help + NumL (on numpad) | Toggle NumLock |
| Help + Scr L (on numpad) | Toggle ScrollLock |
| Help + Ptr Sc (on numpad) | Print Screen |
| Help + Ins (on numpad) | Insert |
| Help + Del (on numpad) | Delete |
| Help + Pg Dn (on numpad) | Page Down |
| Help + Pg Up (on numpad) | Page Up |
| Help + Home (on numpad) | Home |
| Help + End (on numpad) | End |
| Help + F3 | Mute |
| Help + F4 | Volume Down |
| Help + F5 | Volume Up |
| Help + F6 | Play/Pause |
| Help + F7 | Stop |
| Help + F8 | Previous Track |
| Help + F9 | Next Track |
| Help + F10 | Application/Special Key |
When NumLock is turned off, the following keys on the numeric keypad function as navigation keys by default:
- Insert, Delete, Home, End, Page Up, and Page Down.
- The arrow keys on the numeric keypad (2, 4, 6, and 8) also function as cursor movement keys.
With NumLock turned on, these keys will function as standard numeric keys instead. Con be conbined with Help key for alternative function.
- Help: Activates specific special functions or multimedia controls when used in combination with other keys.
- Help + Navigation Keys:
- Help + Ins: Insert.
- Help + Del: Delete.
- Help + Pg Dn: Page Down.
- Help + Pg Up: Page Up.
- Help + Home: Home.
- Help + End: End.
- Help + F3 to F10: Controls multimedia functions:
- Help + F3: Mute the system audio.
- Help + F4: Decrease the volume.
- Help + F5: Increase the volume.
- Help + F6: Toggle Play/Pause for media.
- Help + F7: Stop media playback.
- Help + F8: Go to the previous track.
- Help + F9: Go to the next track.
- Help + F10: Application or Special Key, can be used for opening context menus or other system functions.
- Help + F1 and F2: Standard F11 and F12 functions.
This wiring and mapping setup allows the Amiga 500 keyboard to interface with the Arduino Leonardo effectively, bringing additional functionality with the Help key for multimedia and navigation control. The setup is ideal for retrofitting the keyboard for modern applications while retaining its unique layout and feel.
This guide will help you compile and upload the Amiga 500 Keyboard converter code to an Arduino Leonardo. Choose between the Arduino CLI (for command-line users) or the Arduino IDE (beginner-friendly) to get started.
This method is ideal for users comfortable with the command line. Arduino CLI allows for efficient building and uploading.
- Arduino Leonardo connected via USB
- Arduino CLI installed
-
Install Arduino CLI:
curl -fsSL https://raw.githubusercontent.com/arduino/arduino-cli/master/install.sh | sh sudo mv bin/arduino-cli /usr/local/bin/ -
Configure Arduino CLI:
arduino-cli config init arduino-cli core update-index arduino-cli core install arduino:avr arduino-cli lib install "Keyboard" -
Connect Arduino Leonardo via USB and identify the port:
arduino-cli board list
- Note your board’s port (e.g.,
/dev/ttyACM0) and FQBN (arduino:avr:leonardo).
- Note your board’s port (e.g.,
-
Compile the Sketch: Navigate to the directory containing your
.inofile (e.g.,Amiga500-USB-Keyboard-Leonardo.ino) and run:arduino-cli compile --fqbn arduino:avr:leonardo Amiga500-USB-Keyboard-Leonardo.ino
-
Upload the Sketch:
arduino-cli upload -p /dev/ttyACM0 --fqbn arduino:avr:leonardo Amiga500-USB-Keyboard-Leonardo.ino
- Replace
/dev/ttyACM0with your actual port if different.
- Replace
-
Test the Uploaded Sketch:
- Connect your Amiga 500 keyboard and verify functionality in a text editor.
The Arduino IDE provides a graphical interface for writing, compiling, and uploading Arduino sketches.
-
Install the Arduino IDE:
- Download from Arduino Software.
-
Install the Keyboard Library:
- In the Arduino IDE, go to Tools > Manage Libraries....
- In the Library Manager, search for "Keyboard" and install the Keyboard library.
-
Open Your Sketch:
- Launch the Arduino IDE.
- Go to
File>New, paste your code, and save it asAmiga500-USB-Keyboard-Leonardo.ino.
-
Select Board and Port:
- Go to
Tools>Board> Arduino Leonardo. - Go to
Tools>Portand select the port for your Arduino Leonardo.
- Go to
-
Compile and Upload:
- Click Verify (checkmark icon) to compile.
- Click Upload (arrow icon) to upload the sketch to the board.
-
Test the Keyboard:
- Connect your Amiga 500 keyboard to the Arduino Leonardo.
- Open a text editor and verify functionality.
-
Linux Permissions: If you encounter permission issues on Linux, add your user to the
dialoutgroup:sudo usermod -a -G dialout $USERLog out and back in for changes to take effect.
-
Troubleshooting:
- Ensure correct board and port selection.
- Double-check wiring connections.
- Implement 4 slots for macro recording and replay
- Add auto-repeat keys function
- Create some predefined useful macros